Thursday, 23 May 2013

Chili-Garlic-Herb Grilled Chicken

I heart BBQ-ed chicken. T'is the season after all! Sometimes, the most classic flavour combinations end up being the best. It's all about the balance- spicy, tangy, garlicky, all in one! The other day I got a pack of tiny thai chilis. It came with so many, and the thing is, each tiny chili is super spicy, so I was like, there ain't no way I'm finishing this before it goes bad! So I did the sensible thing and froze them in a ziploc baggy. Now, I put them in EVERYTHING! You use them the same way as chili flakes, and you can always replace with those if you don't have fresh, but fresh is always better! 
Anywhoo, I'm obsessed with anything chili-garlic. So Jamie Oliver-esque. 
I also got a pack of fresh thyme, and froze that too because when do you ever need more than a sprig or two? Otherwise it gets too thym-ey up in there. Ain't nobody got thyme for that! Ha! 
So, for this recipe, I just grabbed a few sprigs of thyme from the freezer. Freezing thyme (get it?) actually makes it easier to take it off the stem than when it's fresh.
Of course, you can use dried thyme for this, but I happened to have fresh, so... yeah....
Ok so this chicken.... I had chicken scallopini which I usually fry and make shnitzel out of, but I was feeling  the grilled route more. Plus, it's healthier! 
Scallopini is a super thin cut of the chicken breast, but you could use regular cutlets for this too, just change the cooking time. Or, you could butterfly the chicken breasts (google helps!) to make them thinner.
I did get a little nervous cooking such a thin piece of chicken on the grill, but don't be! As long as you're watching it to make sure it doesn't get overcooked, it won't! 
Ok... here it is!

Chili-Garlic-Herb Grilled Chicken:

4 boneless-skinless Chicken Breasts (butterfly/scallopini-cut optional)
3 tbsp olive oil
3 tbsp lemon juice
1-2 tbsp garlic, minced finely
1-2 red thai chilies (or any red chili), minced or sliced finely (these had seeds but I didn't remove them because the chilies are so small to begin with, plus, it adds more heat!)
1 tbsp fresh thyme leaves
1 tbsp parsley flakes 
few shakes of salt and pepper

In a glass dish OR a large freezer bag, put all ingredients except for chicken. Mix all ingredients until combined well. Place chicken in dish or bag, cover/seal and place in the fridge. If using thin cuts of chicken, you will only be able to marinate for 15-20 minutes until the lemon juice starts to tenderize the chicken, and you don't want to do this for too long because it will start to break down! (not good!) If using regular cutlets, you can probably marinate for 30 minutes. Halfway between your 'designated' marinating time, flip over the chicken! Ok! We are ready to grill!
Preheat your grill on a low-medium heat. As soon as it's hot, place your chicken on the grill. Let those babies cook! Once you see that the bottom is getting nice grill marks and is browning, flip over and cook the other side. This whole process only takes a few minutes, don't leave your grill or you might get dry chicken! Ew. My worst enemy! 
Anyways, once both sides are brown and have grill marks, they should be ready! Don't let it cook a minute longer than it needs to! Once the inside is fully white (might have to cut into one to check, or you can tell by feeling it, but that takes practice), take it off! 
Now, there's many things you can do with grilled chicken. What I did, I will be saving for my next post, because it was that good! I'll give you a hint.... grilled chicken, peppers and zucchini tossed in chili-garlic oil infused linguine. Ok, that was more than a hint, but get excited! Perfect summertime meal! 
You can also... make paninis, flatbreads, salads.... or eat it just the way it is! 
 My artistic expression? Oh and p.s. I made half this recipe because I only had one pack of meat.
                                              My chicken taking a bath in awesomeness
                         Perfect, tender, juicy, flavourful chicken! I could probably eat all that...


Sunday, 12 May 2013

Garlicky Chummus

Wow, I've been busy in May with no time to post! School's gotten the best of me, I suppose... Well, no excuses, right? I made a Shabbat dinner last week for 30+ people, and my job was salads and desserts. Of course, I never give myself an easy time with things; I need to make everything from scratch and it HAS to be complicated. This recipe happens not to be complicated but everyone loves it and are shocked that it's not store bought. Come on, everybody does it; I should conform at some point, right? Never! Making chummus at home is cheaper, for one.  You also get so much more out of the recipe than a tiny store bought container, and it tastes ten times better! I got this recipe for chummus from my friend's Israeli/Iraqi mother, it's authentic and amazing. It is spicy, but you can adjust the level depending on how much garlic you decide to put. It goes well with everything, especially with other salads and fresh challah. I might just share that recipe with you too (at some point). There's also room (as with every other recipe of mine) to variate on ingredients. I've tried putting white beans, avocados and kale (not all at once but I'm sure that would be interesting). I've also heard of sweet potato chummus! The possibilities are endless!

Garlicky Chummus:
Anat's Recipe

1 28 oz can chickpeas, rinsed and drained
1/2 jar tehina paste
4-5 cloves fresh garlic, peeled and whole
couple squeezes of lemon juice (to taste)
salt (to taste)

In a food processor, blend chickpeas with tehina, garlic and lemon juice, and slowly add in 1 glass of cold water, until it's the consistency you like. Blend until smooth. Add salt to taste! Plate it with a spoonful of schug (spicy chili paste), drizzle with good quality olive oil, and sprinkle with zaatar- in that order. 


                                                                    It's so pretty!!!
                                                                   My babies!!! 
Pictured here, which might be featured as recipes soon are, starting from the top left: Moroccan carrots, babaghanoush, beet salad, Italian bean salad, matbucha, and oh popcorn which I have an extremely addictive recipe for. 
ALL homemade and quite healthy if I may add!!! STAY TUNED!!!

Wednesday, 8 May 2013

Oatmeal Raisin Cookies

Note of caution: this is NOT my recipe, it's my friend's, and I didn't make any changes because it's perfect just the way it is! Nobody said anything about healthy :P but when you need to entertain and want a great recipe that people love, you whip out the hardcore margarine and sugar (yuk). It's okay once in a while...

Oatmeal Raisin Cookies:
By L.P

3/4 cup margarine
3/4 cup lightly packed brown sugar
1/2 cup sugar
1 egg
2 tbsp water
2 tsp vanilla
3/4 cup flour
3/4 tsp baking soda
1 tsp cinnamon
3 cups oats
1 1/2 cups raisins

In a large bowl, cream the margarine and sugars until fluffy and well incorporated. Beat in the egg, water and vanilla. Stir in the dry ingredients. These don't spread out naturally if you leave them as balls, so form these into round, flat (not too flat) cookies on a greased baking sheet. Makes about 24.
Bake at 375 for 8-10 minutes. They are ready when lightly browned. They may seem underdone when they come out of the oven, but they continue cooking from the heat of the pan, and harden a bit as they cool. On that note, leave them on the pan for 5-10 minutes before moving them to a cooling rack. These have the perfect chewy consistency I look for in my cookies! F.Y.I, they also freeze incredibly! 

 Enjoy! And please comment and let me know if you like what you read!

Sunday, 5 May 2013

My Dessert Table :)

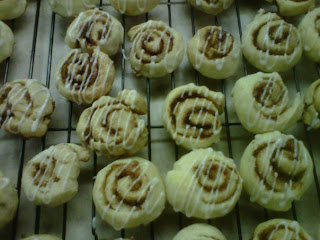
This weekend, I made a whole dessert table for a Friday night dinner I hosted (with lots of help). Everything turned out really well and lots of people asked for recipes... so, here you are! But instead of re-typing every recipe I used, I'll just link you to them :). Let's start with my pride and joy... my mini cinnamon buns!
They're...so...freaking...cute!!! And delicious!!! And surprisingly easy to make! I got the idea and recipe from http://www.canyoustayfordinner.com/2010/12/15/homemade-cinna-minis/.  
Of course, everyone loved them. How could they not? They're so cute and mini! I made them pareve (dairy-free) by using nondairy coffee cream instead of the heavy cream.


The next thing I made were Chewy Molasses Ginger Cookies from Overtime Cook! Thank you, they turned out amazing! You can find the recipe here: http://overtimecook.com/2011/08/11/chewymolassesgingercookies/

I also made yummy Oatmeal Raisin Cookies! I got the recipe from my friend which I will post soon!


I made my Blueberry Pumpkin Mini-Muffins, but instead of pumpkin, I used banana! You can find the measurements with the variations at the bottom of the recipe. So good warm from the oven and still good the next day.... And the day after that... and so forth. :)


Everything also looked much nicer when it was spread out on fancy plates, just by the way! We put the mini muffins in a huge basket, it was so cute!Also, my camera phone sucks, so bear with me!

My 3 am bakings!

Hope you enjoyed!